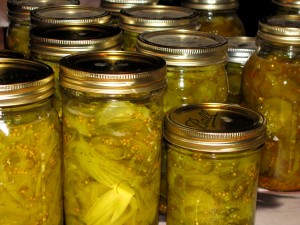
 Pickling is a rite of passage into fall and a promise of good tastes in the winter. It is a time for music, good smells of spice and vinegar and reflection… a time of solitude in the midst of chaos (boiling water, pots clanging, cukes flying). For me, summer without pickling isn’t complete.
– Carolyn Keck
Editor’s Note: We liked this post so much we asked Carolyn for her pickling recipe. Here it is!
Carolyn’s Bread and Butter Pickles
• 6 quarts thin, horizontally sliced pickling cucumbers 6 medium onions, thinly sliced
• 1/2 cup pickling salt
• ice cubes
• quarts white vinegar
• 4 cups Sucanat
• 214 At The Green Kitchen Handbook
• 1/2 cup whole mustard seed
• 1 tablespoon celery seed
• 2 tablespoons pickling spice, wrapped in cheesecloth
• 8 pint jars, or 4 quart jars
a. Put the cucumbers, onions, and salt in a large enamel pot. Stir to combine well. Cover with ice and let sit overnight.
b. Drain the contents of the pot in a colander and in several changes of water. Rinse well.
c. In a large enamel or stainless steel pot, combine the vinegar, sugar, mustard seeds, and pickling spice. Bring the mixture to a boil for several minutes and then add the cucumber and onion mixture. Bring just to a low boil and pack in sterilized jars.
d. Process in a boiling water bath (fifteen minutes for pints, or twenty minutes for quarts) with one inch of water covering the tops of the jars.
1. Packing the Jars
a. Using slotted spoons, funnels, or whatever will work the best, fill the jars with fruit or pickles. Hot packs should be packed loosely, raw packs can be packed tighter.
b. Pour the liquid over the food, leaving the amount of headroom required, as given in the table on page XXX.
c. Push a sterilized knife down the edges of the jars to remove any air pockets. Remove knife.
d. With a clean cloth, wipe the tops of the jars to make sure there is no food that could interfere with a perfect seal.
e. Put tops on the jars securely.
2. Processing the Jars
a. Place the jars in the canner, making sure they are covered by at least one inch of water. Replace the lid.
b. Bring the water to a hard boil. Once it is boiling, you should start the timer according to the times recommended in the table. (If you are at a high altitude, call your state agricultural department for adjustments in boiling times.)
c. If too much water has evaporated, add some from the kettle.
d. When the time is up, remove the jars and place them on racks.
e. Then seal, if the directions for your type of lid require it.
f. Let the jars cool (up to twelve hours or more).
g. Do not retighten lids! If any seals are loose, discard or reprocess from the beginning.
h. After the jars have cooled, test the seal according to manufacturer’s instructions.
i. Label jars with date and contents.
By Annie B. Bond, best-selling and award-winning author of five green living books, thousands of blogs, and all the tips in the Greenify Everything app.


Ooooh I love your bread and butter pickles. Maybe I’ll give ’em a go this week and see if I can carry on the family pickling tradition!!!
Comments are closed.